How to add and manage the content of your app.
Controlling the content of your app is easy. You can upload or delete editions as well as edit existing ones. You can log in via any web browser to gain instant control of your App in-house.
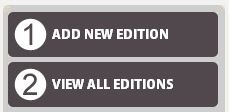
Select Option 1 from the main dashboard menu ADD NEW EDITION
This will take you to the ADD NEW EDITION page. The top section allows you to set various check boxes controlling features of your edition – orientation, subscription/free options and whether to use auto-notification. The middle section relates to naming and describing your edition, plus pricing details if it is not free. The bottom section involves selecting the PDF and optional extra images – a Cover Image to choose a front cover instead of using the first page of your PDF file, and further images that provide the app user with an Image Gallery prior to their downloading the edition.
The Top Section Of The Page
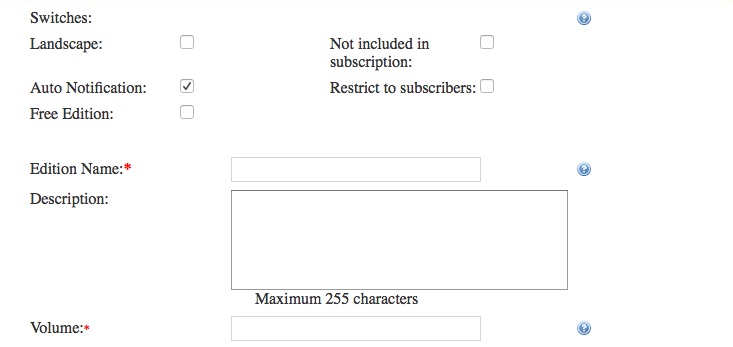
There are a number of checkboxes that you can use to set options for the edition, as follows:
Landscape – Checking this will force your app to lock the orientation of this edition into landscape format.
Not included in subscription – Checking this will make an edition outside your normal subscription structure. This would normally be a ‘paid for’ special or one-off edition, so you will be required to enter pricing information.
Auto Notification – If this option is checked, then when the edition is published, users of your app will automatically receive a notification to that effect. This is known as ‘push notification’ – it is worth noting that the app user can ‘opt out’ of push notifications, so there is no guarantee that your users will see the notification.
Restrict to subscribers – When checked, only logged in users of the app can see this edition.
Free Edition – By checking this option, you are allowing all your app users to download this edition for free.
Do not use this cover on app store – check this option (which is only visible for Newsstand apps) if you don’t want this edition’s cover to replace the magazine’s app store Newsstand cover.
Edition Name – This is how your edition will be named within the app. This is a required field
Description – Here you can add a short description for the edition, you are allowed a maximum of 255 characters. Please note the description does not show when the app is viewed on a smartphone.
Volume – This will be the volume or issue date of your edition / publication. The maximum number of characters allowed here is 24 . This is a required field.
The Middle Section Of The Page
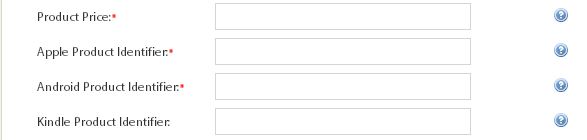
If you do not flag your edition as FREE then you will be prompted to enter the follow information.
Product Price – This must be entered in GBP and must be entered in pounds and pence – for example 2.99 – you do not need to enter the actual pound sign. This is a required field.
Apple Product Identifier – This will normally come in the form of com.AppName001, where AppName reflects your app name. The number at the end of the identifier will be sequential and will increase as you publish more editions. If you have your own developer account then you can create these identifiers for yourself. otherwise we can provide them to you on request. This is a required field.
Andriod ProductIdentifier – This will normally come in the form of com.AppName001, where AppName reflects your app name. The number at the end of the identifier will be sequential and will increase as you publish more editions. If you have your own developer account then you can create these identifiers for yourself. otherwise we can provide them to you on request. This is a required field.
If your app is available within the Kindle Store on Amazon then you are required to complete the following section.
Kindle ProductIdentifier – This will normally come in the form of com.AppName001, where AppName reflects your app name. The number at the end of the identifier will be sequential and will increase as you publish more editions. If you have your own developer account then you can create these identifiers for yourself. otherwise we can provide them to you on request.
The Bottom Section Of The Page
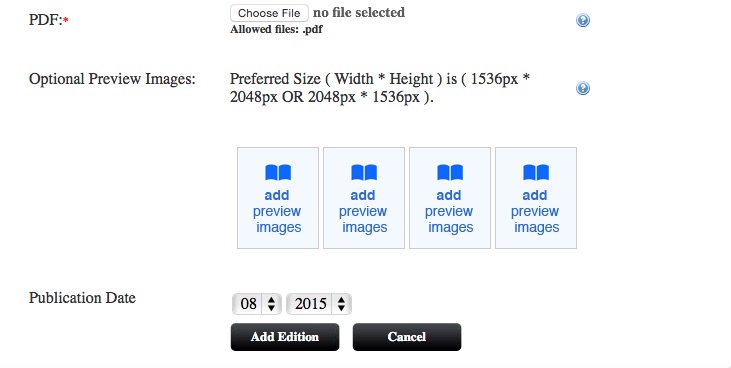
PDF – This is where you will select the PDF that will create your edition on your app. Prior to uploading you will have already optimised your PDF, converted from CMYK to SRGB , inserted your live links and any embedded rich media such as videos or animation. This is a required field.
Optional Preview Images – These images are used by your app to present an image gallery for a new edition before the app user has downloaded it. An additional image, known as the Cover Image, is set to the first page of your pdf file, once you save this edition. You can update the edition at any time and replace the cover image with one of your choice.
The gallery consisting of the Cover image and the Preview images is used by your app to present an image gallery for a new edition prior to the user downloading it.
Images uploaded here will be appended to the first image above to create the gallery. The format of these files is ideally jpg/jpeg, optimised for web, at 175dpi and medium quality. The preferred size (Width * Height) is 1536px * 2048px OR 2048px * 1536px. These images are displayed in the app when a user hits the preview button which is located next to the edition if it has not been downloaded.
Publishing – This will default to the current Month/Year – by changing this to an historical date you are able to publish back issues.
Finally, hitting the Add Product button will save your edition to the Apazine backend, and it is then ready for you to publish from the VIEW ALL EDITIONS page.